
DON’T GET BOXED IN
Many of us are getting ready for big bike adventures this summer. You’ve got the route planned, the plane tickets bought, you accommodations lined up… and there’s one more little detail: getting your bike there. You might think this is the easy part and put it off till a week before you leave, but that could result in disaster.
With this resource guide you can sail smoothly through the process of boxing your bike so your dream vacation doesn’t start out as an anxiety nightmare.
FIRST STEP: SHIPPING OPTIONS
How are you getting your bike there? Start figuring out your shipping options at least one month before your departure. Many airlines will allow bikes as checked luggage, but their pricing varies wildly. Some are as inexpensive as using a shipping option, others charge prices so high you’d think they were professional extortionists.
If you’re binging your bike on the plane, plan on extra time for checking baggage. TSA will likely unwrap your tape job, but don’t courteously keep the box open for them. In my experience, the more I taped the box closed, the better job they did to re-seal it after doing the search. Don’t bother with CO2 or a patch kit – they might be considered explosives. It’s easier to purchase those items at your destination.
You can also ship FedEx, UPS or with a service called BikeFlights.com which offers FedEx shipping for a discount and simplifies a lot of the boxing options for you. Keep in mind the final destination of your bike. Your hotel may hold it or find a local bike shop to receive your shipment. Don’t allow your bike delivery to be left on a friend’s doorstep and hope for the best. Some shops offer a service to receive, unpack and re-assemble your bike for you.
Taking into consideration this advance planning, remember that your bike may be tied up for a week before your trip. If you still need to train, you will probably have to use a different bike during this time.
WHO IS PACKING YOUR BIKE?
Did you know that in order to ship a bike you need to break it down a little bit? It’s not as easy as just tossing the entire bike in a box.
Are you having a bike shop pack your bike? Summer time is when bike shops are slammed with repairs so schedule your boxing early. If you wait to bring it in the day before you need to ship it, you may not have your bike arrive at your destination when you’d planned. From May through September shops are scheduled as far as two weeks out on work orders, so you’re going to have to get in line or pay double if you haven’t scheduled an appointment in time. Remember: your lack of planning is not their emergency.
Having a shop pack your bike professionally will cost a little more but can be worth the piece of mind knowing that they’re doing it right and save you a few hours of your time. You’ll also have to arrange for the bike to be put together at your destination, so many people find the easiest option is to have your local shop ship the bike to a shop at your destination so the bike can be unpacked and assembled while you travel. You’ll want to confirm this in advance with the destination shop, and ensure they can store your box for you.
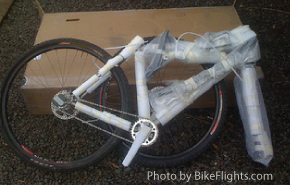
BOXING YOUR OWN BIKE
Are you planning on boxing your own bike? While your different boxing options (cardboard, hard case or soft case) all have their pros and cons, no matter which you choose do not skimp on protection. Airlines– and some shipping conveyor belts– are notorious for treating bikes somewhere between shot put competitions and a WWF showdown. The more surfaces of your bike that are protected and the less it moves inside the box, the better chances that it will arrive unscathed.
You can usually get packing materials from bike shops or create your own. Foam or bubble wrap are great– and you cannot have enough extra zip ties or packing tape. Make sure you pack your tools to assemble it and a roll of tape to re-pack it on the return trip as well.
Packing and unpacking a bike—even for a pro mechanic—takes longer than you’d think, mainly because of all that packing material and taping the box securely closed. Plan on at least an hour on either end. Remember to mark the placement of the seat height and handlebars so you know where they were set when you put them back together.
PRACTICE THE PROCESS
Practice the boxing and re-assembly at least once if not a few times before you go. That way you can shave off some minutes and find out if there’s anything quirky about how your bike fits in the box. It will also give you a good idea if you can fit any extras—like your helmet or shoes—in the box to pack around your bike.
BOXES, CASES AND TRAVELING WITH YOUR BIKE
Check out our article on hard cases, soft cases and using a cardboard box. I recommend you watch all three videos as they have different handlebars and stems. Disassembling or reassembling your bike the wrong way can be disastrous. Asking a skilled friend for tips (or hiring Gracie’s Wrench for an hour to teach you) is a good idea if it is your first time.
DROP US A LINE!
Have a lovely trip, and drop us a line (check our the Wish You Were Here Postcard Contest) to let us know how your summer adventure went!
If you have additional tips for traveling with a bike, please weigh in below in the comments.
Tori Bortman is a bike mechanic, educator, consultant and the owner of Gracie’s Wrench.